本教程早期版本的日语翻译版本可以在 http://prdownloads.sourceforge.jp/jyugem/7127/fsm-tutorial-jp.pdf 找到。由 Mitsuo Fukasawa 慷慨贡献。
Boost Statechart 库是一个框架,允许您快速将 UML 状态图转换为可执行的 C++ 代码,无需使用代码生成器。 感谢对几乎所有 UML 功能的支持,转换非常直接,生成的 C++ 代码几乎是状态图的无冗余文本描述。
本教程旨在线性阅读。初次使用的用户应从头开始阅读,并在掌握足够的知识来完成手头的任务时停止。 具体来说
我们将使用最简单的程序来迈出第一步。 状态图...

... 使用以下代码实现
#include <boost/statechart/state_machine.hpp> #include <boost/statechart/simple_state.hpp> #include <iostream> namespace sc = boost::statechart; // We are declaring all types asstructs only to avoid having to // typepublic. If you don't mind doing so, you can just as well // useclass.// We need to forward-declare the initial state because it can // only be defined at a point where the state machine is // defined. struct Greeting; // Boost.Statechart makes heavy use of the curiously recurring // template pattern. The deriving class must always be passed as // the first parameter to all base class templates. // // The state machine must be informed which state it has to // enter when the machine is initiated. That's why Greeting is // passed as the second template parameter. struct Machine : sc::state_machine< Machine, Greeting > {}; // For each state we need to define which state machine it // belongs to and where it is located in the statechart. Both is // specified with Context argument that is passed to // simple_state<>. For a flat state machine as we have it here, // the context is always the state machine. Consequently, // Machine must be passed as the second template parameter to // Greeting's base (the Context parameter is explained in more // detail in the next example). struct Greeting : sc::simple_state< Greeting, Machine > { // Whenever the state machine enters a state, it creates an // object of the corresponding state class. The object is then // kept alive as long as the machine remains in the state. // Finally, the object is destroyed when the state machine // exits the state. Therefore, a state entry action can be // defined by adding a constructor and a state exit action can // be defined by adding a destructor. Greeting() { std::cout << "Hello World!\n"; } // entry ~Greeting() { std::cout << "Bye Bye World!\n"; } // exit }; int main() { Machine myMachine; // The machine is not yet running after construction. We start // it by calling initiate(). This triggers the construction of // the initial state Greeting myMachine.initiate(); // When we leave main(), myMachine is destructed what leads to // the destruction of all currently active states. return 0; }
这会打印 Hello World! 和 Bye Bye World!,然后退出。
接下来,我们将用状态机建模一个简单的机械秒表。 这种手表通常有两个按钮
和两个状态
以下是在 UML 中指定它的一种方法

这两个按钮由两个事件建模。 此外,我们还定义了必要的状态和初始状态。 以下代码是我们的起点,后续代码片段必须插入
#include <boost/statechart/event.hpp>
#include <boost/statechart/state_machine.hpp>
#include <boost/statechart/simple_state.hpp>

namespace sc = boost::statechart;

struct EvStartStop : sc::event< EvStartStop > {};
struct EvReset : sc::event< EvReset > {};

struct Active;
struct StopWatch : sc::state_machine< StopWatch, Active > {};

struct Stopped;

// The simple_state class template accepts up to four parameters:
// - The third parameter specifies the inner initial state, if
//   there is one. Here, only Active has inner states, which is
//   why it needs to pass its inner initial state Stopped to its
//   base
// - The fourth parameter specifies whether and what kind of
//   history is kept

// Active is the outermost state and therefore needs to pass the
// state machine class it belongs to
struct Active : sc::simple_state<
  Active, StopWatch, Stopped > {};

// Stopped and Running both specify Active as their Context,
// which makes them nested inside Active
struct Running : sc::simple_state< Running, Active > {};
struct Stopped : sc::simple_state< Stopped, Active > {};

// Because the context of a state must be a complete type (i.e.
// not forward declared), a machine must be defined from
// "outside to inside". That is, we always start with the state
// machine, followed by outermost states, followed by the direct
// inner states of outermost states and so on. We can do so in a
// breadth-first or depth-first way or employ a mixture of the
// two.

int main()
{
  StopWatch myWatch;
  myWatch.initiate();
  return 0;
}
这可以编译,但目前不会执行任何可观察到的操作。
目前,我们将仅使用一种反应类型:转换。 我们插入以下代码的粗体部分
#include <boost/statechart/transition.hpp>

// ...

struct Stopped;
struct Active : sc::simple_state< Active, StopWatch, Stopped >
{
  typedef sc::transition< EvReset, Active > reactions;
};

struct Running : sc::simple_state< Running, Active >
{
  typedef sc::transition< EvStartStop, Stopped > reactions;
};

struct Stopped : sc::simple_state< Stopped, Active >
{
  typedef sc::transition< EvStartStop, Running > reactions;
};

// A state can define an arbitrary number of reactions. That's
// why we have to put them into an mpl::list<> as soon as there
// is more than one of them
// (see Specifying multiple reactions for a state).

int main()
{
  StopWatch myWatch;
  myWatch.initiate();
  myWatch.process_event( EvStartStop() );
  myWatch.process_event( EvStartStop() );
  myWatch.process_event( EvStartStop() );
  myWatch.process_event( EvReset() );
  return 0;
}
现在我们已经有了所有状态和所有转换,并且许多事件也被发送到秒表。 机器忠实地执行我们期望的转换,但尚未执行任何动作。
接下来,我们将使秒表实际测量时间。 根据秒表所处的状态,我们需要不同的变量
我们观察到无论机器处于什么状态,都需要经过时间变量。 此外,当我们向机器发送 EvReset 事件时,此变量应重置为 0。 另一个变量仅在机器处于运行状态时才需要。 每当我们进入运行状态时,它都应设置为系统时钟的当前时间。 退出时,我们只需从当前系统时钟时间中减去开始时间,并将结果添加到经过的时间。
#include <ctime>

// ...

struct Stopped;
struct Active : sc::simple_state< Active, StopWatch, Stopped >
{
  public:
    typedef sc::transition< EvReset, Active > reactions;

    Active() : elapsedTime_( 0.0 ) {}
    double ElapsedTime() const { return elapsedTime_; }
    double & ElapsedTime() { return elapsedTime_; }
  private:
    double elapsedTime_;
};

struct Running : sc::simple_state< Running, Active >
{
  public:
    typedef sc::transition< EvStartStop, Stopped > reactions;

    Running() : startTime_( std::time( 0 ) ) {}
    ~Running()
    {
      // Similar to when a derived class object accesses its
      // base class portion, context<>() is used to gain
      // access to the direct or indirect context of a state.
      // This can either be a direct or indirect outer state
      // or the state machine itself
      // (e.g. here: context< StopWatch >()).
      context< Active >().ElapsedTime() +=
        std::difftime( std::time( 0 ), startTime_ );
    }
  private:
    std::time_t startTime_;
};

// ...
机器现在测量时间,但我们还无法从主程序中检索它。
此时,状态本地存储(这仍然是一个相对鲜为人知的功能)的优势可能尚未显现。 FAQ 项“状态本地存储有什么了不起的?” 尝试通过将此秒表与不使用状态本地存储的秒表进行比较,更详细地解释它们。
要检索测量时间,我们需要一种机制来从机器中获取状态信息。 使用我们当前的设计机器,有两种方法可以做到这一点。 为了简单起见,我们使用效率较低的一种:state_cast<>()(StopWatch2.cpp 显示了稍微复杂的替代方案)。 顾名思义,其语义与 dynamic_cast 的语义非常相似。 例如,当我们调用 myWatch.state_cast< const Stopped & >() 并且机器当前处于停止状态时,我们会获得对 Stopped 状态的引用。 否则,将抛出 std::bad_cast。 我们可以使用此功能来实现返回经过时间的 StopWatch 成员函数。 但是,与其询问机器处于哪个状态,然后切换到不同的经过时间计算,不如将计算放入停止和运行状态,并使用接口来检索经过的时间
#include <iostream>

// ...

struct IElapsedTime
{
  virtual double ElapsedTime() const = 0;
};

struct Active;
struct StopWatch : sc::state_machine< StopWatch, Active >
{
  double ElapsedTime() const
  {
    return state_cast< const IElapsedTime & >().ElapsedTime();
  }
};

// ...

struct Running : IElapsedTime,
  sc::simple_state< Running, Active >
{
  public:
    typedef sc::transition< EvStartStop, Stopped > reactions;

    Running() : startTime_( std::time( 0 ) ) {}
    ~Running()
    {
      context< Active >().ElapsedTime() = ElapsedTime();
    }

    virtual double ElapsedTime() const
    {
      return context< Active >().ElapsedTime() +
        std::difftime( std::time( 0 ), startTime_ );
    }
  private:
    std::time_t startTime_;
};

struct Stopped : IElapsedTime,
  sc::simple_state< Stopped, Active >
{
  typedef sc::transition< EvStartStop, Running > reactions;

  virtual double ElapsedTime() const
  {
    return context< Active >().ElapsedTime();
  }
};

int main()
{
  StopWatch myWatch;
  myWatch.initiate();
  std::cout << myWatch.ElapsedTime() << "\n";
  myWatch.process_event( EvStartStop() );
  std::cout << myWatch.ElapsedTime() << "\n";
  myWatch.process_event( EvStartStop() );
  std::cout << myWatch.ElapsedTime() << "\n";
  myWatch.process_event( EvStartStop() );
  std::cout << myWatch.ElapsedTime() << "\n";
  myWatch.process_event( EvReset() );
  std::cout << myWatch.ElapsedTime() << "\n";
  return 0;
}
要实际查看时间测量,您可能需要单步执行 main() 中的语句。 StopWatch 示例将此程序扩展到交互式控制台应用程序。
到目前为止一切顺利。 但是,上面介绍的方法有一些局限性
state_machine::initiate() 的位置,就会发生许多模板实例化,只有当机器的每个状态的完整声明都已知时,这些实例化才能成功。 也就是说,状态机的整个布局必须在一个单独的翻译单元中实现(动作可以单独编译,但这在这里并不重要)。 对于更大(和更真实)的状态机,这会导致以下限制所有这些限制都可以通过自定义反应来克服。 警告:很容易滥用自定义反应,直到调用未定义行为的程度。 在使用它们之前,请仔细阅读文档!
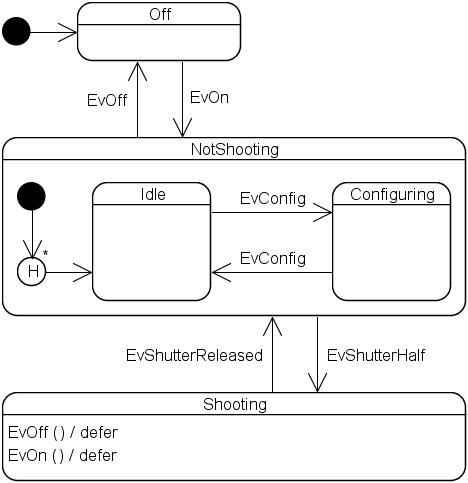
假设您的公司想要开发一款数码相机。 该相机具有以下控件
EvShutterHalf、EvShutterFull 和 EvShutterReleasedEvConfig 事件表示相机的一个用例表明,摄影师可以在配置模式下的任何位置半按快门,相机将立即进入拍摄模式。 以下状态图是实现此行为的一种方法
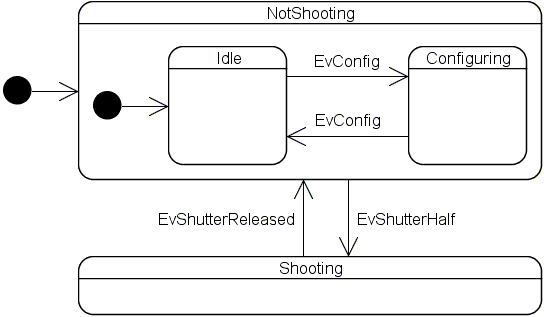
配置和拍摄状态将包含许多嵌套状态,而空闲状态相对简单。 因此,决定建立两个团队。 一个团队将实现拍摄模式,而另一个团队将实现配置模式。 两个团队已经就拍摄团队将用于检索配置设置的接口达成一致。 我们希望确保两个团队可以尽可能少地相互干扰地工作。 因此,我们将两个状态放在它们自己的翻译单元中,以便配置状态内的机器布局更改永远不会导致拍摄状态的内部工作原理的重新编译,反之亦然。
与之前的示例不同,此处提供的摘录通常概述了实现相同效果的不同选项。 这就是为什么代码通常与 Camera 示例代码不相等的原因。 注释标记了这种情况发生的部分。
Camera.hpp
#ifndef CAMERA_HPP_INCLUDED
#define CAMERA_HPP_INCLUDED

#include <boost/statechart/event.hpp>
#include <boost/statechart/state_machine.hpp>
#include <boost/statechart/simple_state.hpp>
#include <boost/statechart/custom_reaction.hpp>

namespace sc = boost::statechart;

struct EvShutterHalf : sc::event< EvShutterHalf > {};
struct EvShutterFull : sc::event< EvShutterFull > {};
struct EvShutterRelease : sc::event< EvShutterRelease > {};
struct EvConfig : sc::event< EvConfig > {};

struct NotShooting;
struct Camera : sc::state_machine< Camera, NotShooting >
{
  bool IsMemoryAvailable() const { return true; }
  bool IsBatteryLow() const { return false; }
};

struct Idle;
struct NotShooting : sc::simple_state<
  NotShooting, Camera, Idle >
{
  // With a custom reaction we only specify that we might do
  // something with a particular event, but the actual reaction
  // is defined in the react member function, which can be
  // implemented in the .cpp file.
  typedef sc::custom_reaction< EvShutterHalf > reactions;

  // ...
  sc::result react( const EvShutterHalf & );
};

struct Idle : sc::simple_state< Idle, NotShooting >
{
  typedef sc::custom_reaction< EvConfig > reactions;

  // ...
  sc::result react( const EvConfig & );
};

#endif
Camera.cpp
#include "Camera.hpp"

// The following includes are only made here but not in
// Camera.hpp
// The Shooting and Configuring states can themselves apply the
// same pattern to hide their inner implementation, which
// ensures that the two teams working on the Camera state
// machine will never need to disturb each other.
#include "Configuring.hpp"
#include "Shooting.hpp"

// ...

// not part of the Camera example
sc::result NotShooting::react( const EvShutterHalf & )
{
  return transit< Shooting >();
}

sc::result Idle::react( const EvConfig & )
{
  return transit< Configuring >();
}
注意:任何对 simple_state<>::transit<>() 或 simple_state<>::terminate() 的调用(参见 参考)都将不可避免地销毁状态对象(类似于 delete this;)! 也就是说,在任何这些调用之后执行的代码都可能调用未定义的行为! 这就是为什么这些函数只应作为返回语句的一部分调用。
拍摄状态的内部工作原理可能如下所示
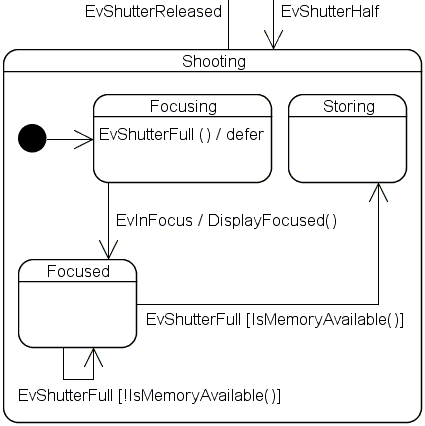
当用户半按快门时,将进入拍摄及其内部初始状态聚焦。 在聚焦条目动作中,相机指示聚焦电路将主体聚焦。 然后,聚焦电路相应地移动镜头,并在完成后发送 EvInFocus 事件。 当然,用户可以在镜头仍在运动时完全按下快门。 如果没有任何预防措施,生成的 EvShutterFull 事件将简单地丢失,因为聚焦状态未定义此事件的反应。 结果,用户必须在相机完成聚焦后再次完全按下快门。 为了防止这种情况,EvShutterFull 事件在聚焦状态内被延迟。 这意味着此类型的所有事件都存储在一个单独的队列中,该队列在聚焦状态退出时被清空到主队列中。
struct Focusing : sc::state< Focusing, Shooting >
{
  typedef mpl::list<
    sc::custom_reaction< EvInFocus >,
    sc::deferral< EvShutterFull >
  > reactions;

  Focusing( my_context ctx );
  sc::result react( const EvInFocus & );
};
源自聚焦状态的两个转换都由同一事件触发,但它们具有互斥的守卫。 以下是适当的自定义反应
// not part of the Camera example
sc::result Focused::react( const EvShutterFull & )
{
  if ( context< Camera >().IsMemoryAvailable() )
  {
    return transit< Storing >();
  }
  else
  {
    // The following is actually a mixture between an in-state
    // reaction and a transition. See later on how to implement
    // proper transition actions.
    std::cout << "Cache memory full. Please wait...\n";
    return transit< Focused >();
  }
}
自定义反应当然也可以直接在状态声明中实现,这通常更适合于方便浏览。
接下来,我们将使用守卫来防止转换,并在电池电量低时让外部状态对事件做出反应
Camera.cpp
// ...
sc::result NotShooting::react( const EvShutterHalf & )
{
  if ( context< Camera >().IsBatteryLow() )
  {
    // We cannot react to the event ourselves, so we forward it
    // to our outer state (this is also the default if a state
    // defines no reaction for a given event).
    return forward_event();
  }
  else
  {
    return transit< Shooting >();
  }
}
// ...
聚焦状态的自转换也可以实现为状态内反应,只要聚焦状态没有任何条目或退出动作,它就具有相同的效果
Shooting.cpp
// ...
sc::result Focused::react( const EvShutterFull & )
{
  if ( context< Camera >().IsMemoryAvailable() )
  {
    return transit< Storing >();
  }
  else
  {
    std::cout << "Cache memory full. Please wait...\n";
    // Indicate that the event can be discarded. So, the
    // dispatch algorithm will stop looking for a reaction
    // and the machine remains in the Focused state.
    return discard_event();
  }
}
// ...
由于状态内反应受到守卫,我们需要在此处使用 custom_reaction<>。 对于无守卫的状态内反应,应使用 in_state_reaction<> 以获得更好的代码可读性。
作为每个转换的效果,动作按以下顺序执行
示例
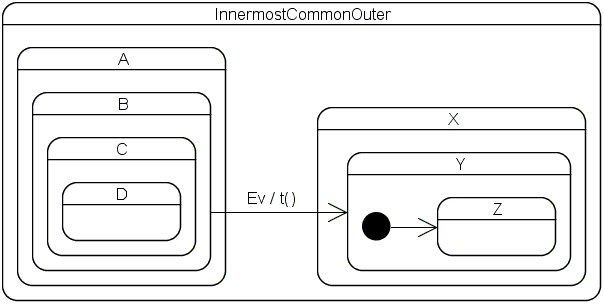
这里的顺序如下:~D(), ~C(), ~B(), ~A(), t(), X(), Y(), Z()。 因此,转换动作 t() 在 InnermostCommonOuter 状态的上下文中执行,因为源状态已被离开(销毁),而目标状态尚未进入(构造)。
使用 Boost.Statechart,转换动作可以是任何公共外部上下文的成员。 也就是说,聚焦和已聚焦之间的转换可以按如下方式实现
Shooting.hpp
// ...
struct Focusing;
struct Shooting : sc::simple_state< Shooting, Camera, Focusing >
{
  typedef sc::transition<
    EvShutterRelease, NotShooting > reactions;

  // ...
  void DisplayFocused( const EvInFocus & );
};

// ...

// not part of the Camera example
struct Focusing : sc::simple_state< Focusing, Shooting >
{
  typedef sc::transition< EvInFocus, Focused,
    Shooting, &Shooting::DisplayFocused > reactions;
};
或者,以下也是可能的(这里状态机本身充当最外层上下文)
// not part of the Camera example
struct Camera : sc::state_machine< Camera, NotShooting >
{
  void DisplayFocused( const EvInFocus & );
};
// not part of the Camera example
struct Focusing : sc::simple_state< Focusing, Shooting >
{
  typedef sc::transition< EvInFocus, Focused,
    Camera, &Camera::DisplayFocused > reactions;
};
自然,转换动作也可以从自定义反应中调用
Shooting.cpp
// ...
sc::result Focusing::react( const EvInFocus & evt )
{
  // We have to manually forward evt
  return transit< Focused >( &Shooting::DisplayFocused, evt );
}
通常,一个状态必须为多个事件定义反应。 在这种情况下,必须使用 mpl::list<>,如下所述
// ...

#include <boost/mpl/list.hpp>

namespace mpl = boost::mpl;

// ...

struct Playing : sc::simple_state< Playing, Mp3Player >
{
  typdef mpl::list<
    sc::custom_reaction< EvFastForward >,
    sc::transition< EvStop, Stopped > > reactions;

  /* ... */
};
非平凡状态机通常需要发布内部事件。 以下是如何执行此操作的示例
Pumping::~Pumping()
{
  post_event( EvPumpingFinished() );
}
该事件被推送到主队列中。 一旦当前反应完成,队列中的事件将被处理。 事件可以从 react 函数、条目、退出和转换动作内部发布。 但是,从条目动作内部发布有点复杂(例如,请参见 Camera 示例中 Shooting.cpp 中的 Focusing::Focusing())
struct Pumping : sc::state< Pumping, Purifier >
{
  Pumping( my_context ctx ) : my_base( ctx )
  {
    post_event( EvPumpingStarted() );
  }
  // ...
};
一旦状态的条目动作需要联系“外部世界”(此处:状态机中的事件队列),该状态必须从 state<> 而不是从 simple_state<> 派生,并且必须实现如上所述的转发构造函数(除了构造函数之外,state<> 提供与 simple_state<> 相同的接口)。 因此,每当条目动作对以下一个或多个函数进行调用时,都必须这样做
simple_state<>::post_event()simple_state<>::clear_shallow_history<>()simple_state<>::clear_deep_history<>()simple_state<>::outermost_context()simple_state<>::context<>()simple_state<>::state_cast<>()simple_state<>::state_downcast<>()simple_state<>::state_begin()simple_state<>::state_end()根据我的经验,这些函数在条目动作中很少需要,因此这种解决方法不应过多地丑化用户代码。
测试我们数码相机 Beta 版本的摄影师表示,他们非常喜欢随时半按快门(即使在配置相机时)也能立即让相机准备好拍照。 但是,他们中的大多数人发现,相机在释放快门后总是进入空闲模式,这很不直观。 他们宁愿看到相机回到半按快门之前的状态。 这样,他们可以通过修改配置设置、半按然后完全按下快门拍照来轻松测试配置设置的影响。 最后,释放快门会将他们带回到他们修改设置的屏幕。 为了实现此行为,我们将按如下方式更改状态图
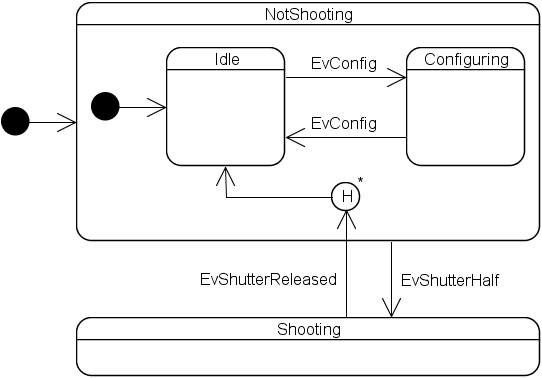
如前所述,配置状态包含一个相当复杂且深度嵌套的内部机器。 自然,我们希望将之前的状态恢复到配置中的最内层状态。 这就是我们使用深度历史伪状态的原因。 相关代码如下所示
// not part of the Camera example
struct NotShooting : sc::simple_state<
  NotShooting, Camera, Idle, sc::has_deep_history >
{
  // ...
};

// ...

struct Shooting : sc::simple_state< Shooting, Camera, Focusing >
{
  typedef sc::transition<
    EvShutterRelease, sc::deep_history< Idle > > reactions;

  // ...
};
历史有两个阶段:首先,当包含历史伪状态的状态退出时,必须保存有关先前活动内部状态层次结构的信息。 其次,当稍后进行到历史伪状态的转换时,必须检索保存的状态层次结构信息并进入相应的状态。 前者通过将 has_shallow_history、has_deep_history 或 has_full_history(它结合了浅层历史和深层历史)作为 simple_state 和 state 类模板的最后一个参数来表达。 后者通过将 shallow_history<> 或 deep_history<> 指定为转换目标或,正如我们将在稍后看到的,作为内部初始状态来表达。 因为可能包含历史伪状态的状态在进行到历史的转换之前从未进入过,所以这两个类模板都需要一个参数来指定在这种情况下要进入的默认状态。
使用历史所需的冗余在编译时检查一致性。 也就是说,如果我们忘记将 has_deep_history 传递给 NotShooting 的基类,则状态机将无法编译。
一些 Beta 测试人员提出的另一个更改请求是,他们希望看到相机在重新打开时返回到关闭之前的状态。 这是实现
// ...

// not part of the Camera example
struct NotShooting : sc::simple_state< NotShooting, Camera,
  mpl::list< sc::deep_history< Idle > >,
  sc::has_deep_history >
{
  // ...
};

// ...
不幸的是,由于一些与模板相关的实现细节,存在一个小的不便之处。 当内部初始状态是类模板实例化时,我们总是必须将其放入 mpl::list<> 中,尽管只有一个内部初始状态。 此外,当前的深度历史实现有一些限制。
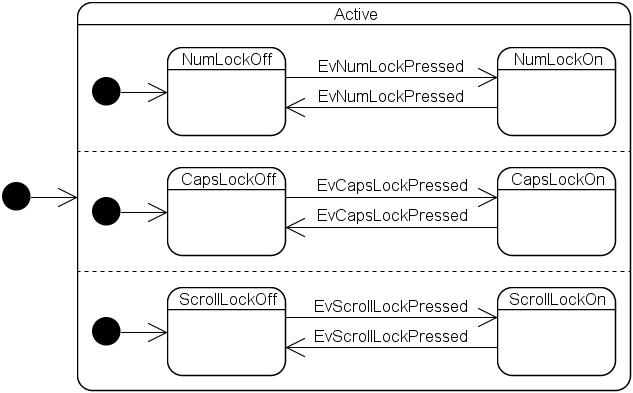
要实现此状态图,您只需指定多个内部初始状态(请参见 Keyboard 示例)
struct Active;
struct Keyboard : sc::state_machine< Keyboard, Active > {};

struct NumLockOff;
struct CapsLockOff;
struct ScrollLockOff;
struct Active: sc::simple_state< Active, Keyboard,
  mpl::list< NumLockOff, CapsLockOff, ScrollLockOff > > {};
Active 的内部状态必须声明它们所属的正交区域
struct EvNumLockPressed : sc::event< EvNumLockPressed > {};
struct EvCapsLockPressed : sc::event< EvCapsLockPressed > {};
struct EvScrollLockPressed :
  sc::event< EvScrollLockPressed > {};

struct NumLockOn : sc::simple_state<
  NumLockOn, Active::orthogonal< 0 > >
{
  typedef sc::transition<
    EvNumLockPressed, NumLockOff > reactions;
};

struct NumLockOff : sc::simple_state<
  NumLockOff, Active::orthogonal< 0 > >
{
  typedef sc::transition<
    EvNumLockPressed, NumLockOn > reactions;
};

struct CapsLockOn : sc::simple_state<
  CapsLockOn, Active::orthogonal< 1 > >
{
  typedef sc::transition<
    EvCapsLockPressed, CapsLockOff > reactions;
};

struct CapsLockOff : sc::simple_state<
  CapsLockOff, Active::orthogonal< 1 > >
{
  typedef sc::transition<
    EvCapsLockPressed, CapsLockOn > reactions;
};

struct ScrollLockOn : sc::simple_state<
  ScrollLockOn, Active::orthogonal< 2 > >
{
  typedef sc::transition<
    EvScrollLockPressed, ScrollLockOff > reactions;
};

struct ScrollLockOff : sc::simple_state<
  ScrollLockOff, Active::orthogonal< 2 > >
{
  typedef sc::transition<
    EvScrollLockPressed, ScrollLockOn > reactions;
};
orthogonal< 0 > 是默认值,因此 NumLockOn 和 NumLockOff 可以像传递 Active 而不是 Active::orthogonal< 0 > 一样来指定它们的上下文。 传递给 orthogonal 成员模板的数字必须与外部状态中的列表位置相对应。 此外,转换源状态的正交位置必须与目标状态的正交位置相对应。 违反这些规则中的任何一条都会导致编译时错误。 例子
// Example 1: does not compile because Active specifies
// only 3 orthogonal regions
struct WhateverLockOn: sc::simple_state<
  WhateverLockOn, Active::orthogonal< 3 > > {};

// Example 2: does not compile because Active specifies
// that NumLockOff is part of the "0th" orthogonal region
struct NumLockOff : sc::simple_state<
  NumLockOff, Active::orthogonal< 1 > > {};

// Example 3: does not compile because a transition between
// different orthogonal regions is not permitted
struct CapsLockOn : sc::simple_state<
  CapsLockOn, Active::orthogonal< 1 > >
{
  typedef sc::transition<
    EvCapsLockPressed, CapsLockOff > reactions;
};

struct CapsLockOff : sc::simple_state<
  CapsLockOff, Active::orthogonal< 2 > >
{
  typedef sc::transition<
    EvCapsLockPressed, CapsLockOn > reactions;
};
状态机中的反应通常取决于一个或多个正交区域中的活动状态。 这是因为正交区域并非完全正交,或者只有当内部正交区域处于特定状态时,外部状态中的特定反应才能发生。 为此,在 从机器中获取状态信息 下介绍的 state_cast<> 函数在状态内也可用。
作为一个有点牵强的例子,让我们假设我们的键盘也接受 EvRequestShutdown 事件,只有当所有锁定键都处于关闭状态时,接收到该事件才会使键盘终止。 然后我们将按如下方式修改键盘状态机
struct EvRequestShutdown : sc::event< EvRequestShutdown > {};

struct NumLockOff;
struct CapsLockOff;
struct ScrollLockOff;
struct Active: sc::simple_state< Active, Keyboard,
  mpl::list< NumLockOff, CapsLockOff, ScrollLockOff > >
{
  typedef sc::custom_reaction< EvRequestShutdown > reactions;

  sc::result react( const EvRequestShutdown & )
  {
    if ( ( state_downcast< const NumLockOff * >() != 0 ) &&
         ( state_downcast< const CapsLockOff * >() != 0 ) &&
         ( state_downcast< const ScrollLockOff * >() != 0 ) )
    {
      return terminate();
    }
    else
    {
      return discard_event();
    }
  }
};
传递指针类型而不是引用类型会导致在强制转换失败时返回 0 指针,而不是抛出 std::bad_cast。 另请注意使用 state_downcast<>() 而不是 state_cast<>()。 类似于 boost::polymorphic_downcast<>() 和 dynamic_cast 之间的差异,state_downcast<>() 是 state_cast<>() 的更快变体,并且仅当传递的类型是最派生类型时才能使用。 state_cast<>() 仅当您要查询附加基类时才应使用。
通常希望确切地找出机器当前驻留在哪个状态中。 在某种程度上,这已经可以通过 state_cast<>() 和 state_downcast<>() 实现,但它们的实用性相当有限,因为两者都只返回对问题“您是否处于状态 X?”的是/否答案。 当您将附加基类而不是状态类传递给 state_cast<>() 时,可以提出更复杂的问题,但这涉及更多工作(所有状态都需要从附加基类派生并实现它),速度较慢(在底层,state_cast<>() 使用 dynamic_cast),强制项目在启用 C++ RTTI 的情况下编译,并且对状态进入/退出速度产生负面影响。
特别是对于调试,能够询问“您处于哪个状态?”会更有用。 为此,可以使用 state_machine<>::state_begin() 和 state_machine<>::state_end() 迭代所有活动最内层状态。 解引用返回的迭代器会返回对 const state_machine<>::state_base_type 的引用,这是所有状态的公共基类。 因此,我们可以按如下方式打印当前活动状态配置(有关完整代码,请参见 Keyboard 示例)
void DisplayStateConfiguration( const Keyboard & kbd )
{
  char region = 'a';

  for (
    Keyboard::state_iterator pLeafState = kbd.state_begin();
    pLeafState != kbd.state_end(); ++pLeafState )
  {
    std::cout << "Orthogonal region " << region << ": ";
    // The following use of typeid assumes that
    // BOOST_STATECHART_USE_NATIVE_RTTI is defined
    std::cout << typeid( *pLeafState ).name() << "\n";
    ++region;
  }
}
如有必要,可以使用 state_machine<>::state_base_type::outer_state_ptr() 访问外部状态,该函数返回指向 const state_machine<>::state_base_type 的指针。 当在最外层状态上调用时,此函数仅返回 0。
为了减少可执行文件的大小,某些应用程序必须在禁用 C++ RTTI 的情况下编译。 如果没有以下两个函数,这将使迭代所有活动状态的能力几乎毫无用处
static unspecified_type simple_state<>::static_type()unspecified_type
state_machine<>::state_base_type::dynamic_type() const两者都返回一个值,该值可以通过 operator==() 和 std::less<> 进行比较。 仅此一项就足以在没有 typeid 帮助的情况下实现上面的 DisplayStateConfiguration 函数,但这仍然有些麻烦,因为必须使用 map 将类型信息值与状态名称关联起来。
这就是也提供以下函数的原因(仅当未定义 BOOST_STATECHART_USE_NATIVE_RTTI 时可用)
template< class T >
static void simple_state<>::custom_static_type_ptr( const T * );
template< class T >
static const T * simple_state<>::custom_static_type_ptr();template< class T >
const T * state_machine<>:
state_base_type::custom_dynamic_type_ptr() const;这些允许我们直接将任意状态类型信息与每个状态关联...
// ...

int main()
{
  NumLockOn::custom_static_type_ptr( "NumLockOn" );
  NumLockOff::custom_static_type_ptr( "NumLockOff" );
  CapsLockOn::custom_static_type_ptr( "CapsLockOn" );
  CapsLockOff::custom_static_type_ptr( "CapsLockOff" );
  ScrollLockOn::custom_static_type_ptr( "ScrollLockOn" );
  ScrollLockOff::custom_static_type_ptr( "ScrollLockOff" );

  // ...
}
... 并按如下方式重写显示函数
void DisplayStateConfiguration( const Keyboard & kbd )
{
  char region = 'a';

  for (
    Keyboard::state_iterator pLeafState = kbd.state_begin();
    pLeafState != kbd.state_end(); ++pLeafState )
  {
    std::cout << "Orthogonal region " << region << ": ";
    std::cout <<
      pLeafState->custom_dynamic_type_ptr< char >() << "\n";
    ++region;
  }
}
异常可以从除状态析构函数之外的所有用户代码传播。 开箱即用,状态机框架配置为简单的异常处理,并且不捕获任何这些异常,因此它们会立即传播到状态机客户端。 state_machine<> 内部的作用域守卫确保在客户端捕获异常之前销毁所有状态对象。 作用域守卫不尝试调用任何状态可能定义的 exit 函数(请参见下面的 两阶段退出),因为这些函数本身可能会抛出其他异常,从而掩盖原始异常。 因此,如果状态机在抛出异常时应执行更明智的操作,则必须在异常传播到 Boost.Statechart 框架之前捕获它们。 这种异常处理方案通常是合适的,但它可能导致状态机中大量的代码重复,在状态机中,许多动作可能会触发需要在状态机内部处理的异常(请参见原理中的 错误处理)。
这就是为什么可以通过 state_machine 类模板的 ExceptionTranslator 参数来自定义异常处理的原因。 由于开箱即用的行为是不转换任何异常,因此此参数的默认参数为 null_exception_translator。 可以通过指定库提供的 exception_translator<> 来为高级异常处理配置 state_machine<> 子类型。 这样,当异常从用户代码传播时,会发生以下情况
exception_thrown 事件exception_thrown 事件。 也就是说,队列中可能剩余的事件仅在异常已成功处理后才分派在异常处理实现有缺陷的平台上,用户可能希望实现他们自己的 ExceptionTranslator 概念 模型(另请参见 区分异常)。
如果满足以下条件,则认为异常已成功处理
exception_thrown 事件的适当反应,并且第二个条件对于下一节中的场景 2 和 3 很重要。 在这些场景中,当异常被处理时,状态机正处于转换的中间。 如果反应只是丢弃事件而不做任何其他事情,则机器将处于无效状态。 如果异常处理不成功,exception_translator<> 只需重新抛出原始异常。 与简单的异常处理一样,在这种情况下,state_machine<> 内部的作用域守卫确保在客户端捕获异常之前销毁所有状态对象。
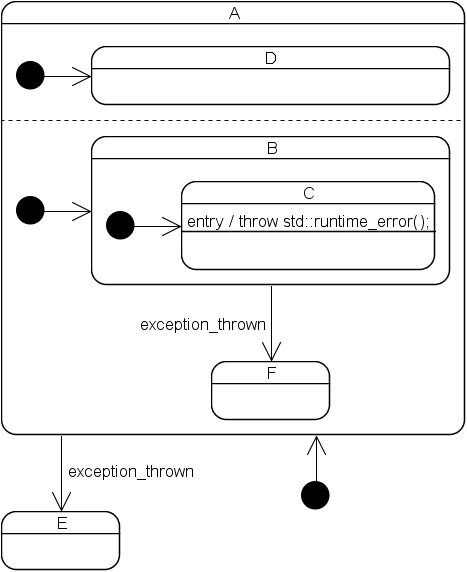
exception_thrown 事件做出反应?简短回答:如果在抛出异常时状态机是稳定的,则首先尝试导致异常的状态以进行反应。 否则,首先尝试最外层不稳定状态以进行反应。
较长的答案:有三种场景
react 成员函数在调用任何反应函数之前传播异常,或者在状态内反应期间执行的动作传播异常。 首先尝试导致异常的状态以进行反应,因此以下机器在收到 EvStart 事件后将转换到 Defective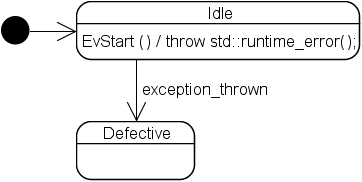
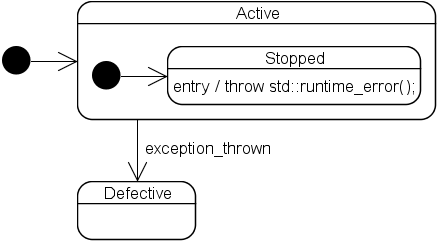
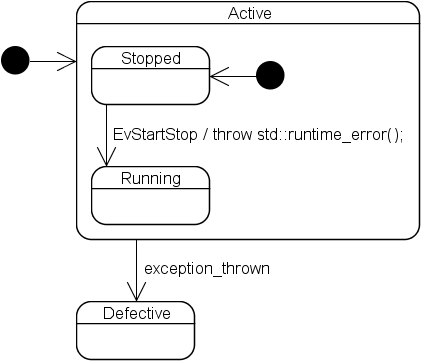
与普通事件一样,如果第一个尝试的状态未提供反应(或者如果反应显式返回 forward_event();),则分派算法将向外移动以查找反应。 但是,与普通事件相反,一旦它不成功地尝试了最外层状态,它就会放弃,因此以下机器在收到 EvNumLockPressed 事件后不会转换到 Defective
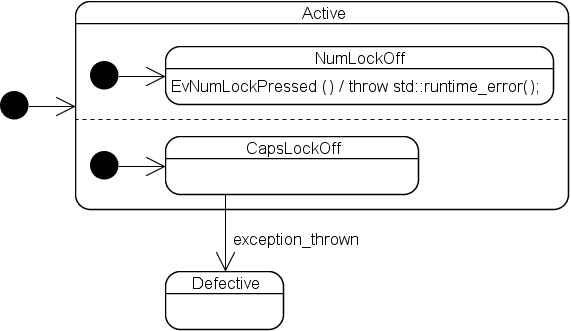
相反,机器被终止,原始异常被重新抛出。
由于 exception_thrown 事件是从 catch 块内部分派的,因此我们可以在自定义反应中重新抛出并捕获异常
struct Defective : sc::simple_state<
  Defective, Purifier > {};

// Pretend this is a state deeply nested in the Purifier
// state machine
struct Idle : sc::simple_state< Idle, Purifier >
{
  typedef mpl::list<
    sc::custom_reaction< EvStart >,
    sc::custom_reaction< sc::exception_thrown >
  > reactions;

  sc::result react( const EvStart & )
  {
    throw std::runtime_error( "" );
  }

  sc::result react( const sc::exception_thrown & )
  {
    try
    {
      throw;
    }
    catch ( const std::runtime_error & )
    {
      // only std::runtime_errors will lead to a transition
      // to Defective ...
      return transit< Defective >();
    }
    catch ( ... )
    {
      // ... all other exceptions are forwarded to our outer
      // state(s). The state machine is terminated and the
      // exception rethrown if the outer state(s) can't
      // handle it either...
      return forward_event();
    }

    // Alternatively, if we want to terminate the machine
    // immediately, we can also either rethrow or throw
    // a different exception.
  }
};
不幸的是,这种习惯用法(在嵌套在 catch 块内的 try 块内使用 throw;)在至少一个非常流行的编译器上不起作用。 如果您必须使用这些平台之一,则可以将自定义的异常转换器类传递给 state_machine 类模板。 这将允许您根据异常的类型生成不同的事件。
如果 simple_state<> 或 state<> 子类型声明了一个签名为 void exit() 的公共成员函数,则在状态对象被销毁之前立即调用此函数。 正如原理中的 错误处理 中所解释的那样,这对于两件事很有用,否则仅使用析构函数很难或很麻烦地实现
在使用 exit() 之前需要考虑以下几点
exit()terminate() 的情况下销毁状态机对象,则当前活动状态将在不调用 exit() 的情况下被销毁。 这是必要的,因为可能从 exit() 抛出的异常无法传播到状态机客户端exit()。 这是因为可能从 exit() 抛出的新异常会掩盖原始异常exit 函数传播了异常,状态也被认为是退出了。 也就是说,状态对象在调用 exit() 后立即不可避免地被销毁,无论 exit() 是否传播了异常。 因此,配置为高级异常处理的状态机在处理从 exit 函数传播的异常时始终是不稳定的exit() 传播的异常产生的异常事件的处理规则类似于为从状态构造函数传播的异常定义的规则。 也就是说,首先尝试最外层不稳定状态以进行反应,然后分派器向外移动,直到找到合适的反应子状态机对于事件驱动编程的意义就像函数对于过程编程的意义一样,即可重用的构建块,用于实现经常需要的功能。 相关的 UML 表示法对我来说不是很清楚。 它似乎受到严重限制(例如,同一个子状态机不能出现在不同的正交区域中),并且似乎没有考虑到显而易见的东西,例如参数。
Boost.Statechart 完全不知道子状态机,但可以使用模板很好地实现它们。 在这里,子状态机用于改进在 正交状态 下讨论的键盘机器的复制粘贴实现
enum LockType
{
  NUM_LOCK,
  CAPS_LOCK,
  SCROLL_LOCK
};

template< LockType lockType >
struct Off;
struct Active : sc::simple_state<
  Active, Keyboard, mpl::list<
  Off< NUM_LOCK >, Off< CAPS_LOCK >, Off< SCROLL_LOCK > > > {};

template< LockType lockType >
struct EvPressed : sc::event< EvPressed< lockType > > {};

template< LockType lockType >
struct On : sc::simple_state<
  On< lockType >, Active::orthogonal< lockType > >
{
  typedef sc::transition<
    EvPressed< lockType >, Off< lockType > > reactions;
};

template< LockType lockType >
struct Off : sc::simple_state<
  Off< lockType >, Active::orthogonal< lockType > >
{
  typedef sc::transition<
    EvPressed< lockType >, On< lockType > > reactions;
};
顾名思义,同步状态机同步处理每个事件。此行为由 state_machine 类模板实现,其 process_event 函数仅在执行完所有反应(包括操作可能引发的内部事件所激发的反应)后才返回。此函数是严格不可重入的(就像所有其他成员函数一样,因此 state_machine<> 不是线程安全的)。这使得两个 state_machine<> 子类型对象难以通过事件以双向方式正确通信,即使在单线程程序中也是如此。 例如,状态机 A 正在处理外部事件的过程中。在操作内部,它决定向状态机 B 发送新事件(通过调用 B::process_event())。然后,它“等待” B 通过类似 boost::function<> 的回调来发回答案,该回调引用 A::process_event() 并作为事件的数据成员传递。 然而,当 A “等待” B 发回事件时,A::process_event() 尚未从处理外部事件返回,并且一旦 B 通过回调应答,A::process_event() 不可避免地被重入。所有这一切都真真切切地发生在单线程中,这就是为什么“等待”要加引号。
asynchronous_state_machine 类模板不具有 state_machine 类模板所拥有的任何成员函数。此外,甚至不能直接创建或销毁 asynchronous_state_machine<> 子类型对象。相反,所有这些操作都必须通过每个异步状态机关联的 Scheduler 对象来执行。所有这些 Scheduler 成员函数都只是将相应的项目推送到调度器的队列中,然后立即返回。一个专用线程稍后将从队列中弹出这些项目以进行处理。
应用程序通常首先创建一个 fifo_scheduler<> 对象,然后调用 fifo_scheduler<>::create_processor<>() 和 fifo_scheduler<>::initiate_processor() 来调度一个或多个 asynchronous_state_machine<> 子类型对象的创建和初始化。最后,直接调用 fifo_scheduler<>::operator()() 以让机器在当前线程中运行,或者,将引用 operator()() 的 boost::function<> 对象传递给新的 boost::thread。或者,也可以在构造 fifo_scheduler<> 对象后立即完成后者。在以下代码中,我们正在新的 boost::thread 中运行一个状态机,并在主线程中运行另一个状态机(有关完整源代码,请参见 PingPong 示例)
struct Waiting;
struct Player :
  sc::asynchronous_state_machine< Player, Waiting >
{
  // ...
};

// ...

int main()
{
  // Create two schedulers that will wait for new events
  // when their event queue runs empty
  sc::fifo_scheduler<> scheduler1( true );
  sc::fifo_scheduler<> scheduler2( true );

  // Each player is serviced by its own scheduler
  sc::fifo_scheduler<>::processor_handle player1 =
    scheduler1.create_processor< Player >( /* ... */ );
  scheduler1.initiate_processor( player1 );
  sc::fifo_scheduler<>::processor_handle player2 =
    scheduler2.create_processor< Player >( /* ... */ );
  scheduler2.initiate_processor( player2 );

  // the initial event that will start the game
  boost::intrusive_ptr< BallReturned > pInitialBall =
    new BallReturned();

  // ...

  scheduler2.queue_event( player2, pInitialBall );

  // ...

  // Up until here no state machines exist yet. They
  // will be created when operator()() is called

  // Run first scheduler in a new thread
  boost::thread otherThread( boost::bind(
    &sc::fifo_scheduler<>::operator(), &scheduler1, 0 ) );
  scheduler2(); // Run second scheduler in this thread
  otherThread.join();

  return 0;
}
我们可以同样好地使用两个 boost::threads
int main()
{
  // ...

  boost::thread thread1( boost::bind(
    &sc::fifo_scheduler<>::operator(), &scheduler1, 0 ) );
  boost::thread thread2( boost::bind(
    &sc::fifo_scheduler<>::operator(), &scheduler2, 0 ) );

  // do something else ...

  thread1.join();
  thread2.join();

  return 0;
}
或者,在同一线程中运行两个机器
int main()
{
  sc::fifo_scheduler<> scheduler1( true );

  sc::fifo_scheduler<>::processor_handle player1 =
    scheduler1.create_processor< Player >( /* ... */ );
  sc::fifo_scheduler<>::processor_handle player2 =
    scheduler1.create_processor< Player >( /* ... */ );

  // ...

  scheduler1();

  return 0;
}
在以上所有示例中,fifo_scheduler<>::operator()() 等待空事件队列,并且仅在调用 fifo_scheduler<>::terminate() 后才会返回。 Player 状态机在其调度器对象上终止之前调用此函数。
已修订2006 年 12 月 3 日
版权所有 © 2003-2006 Andreas Huber Dönni
根据 Boost 软件许可协议 1.0 版分发。(请参阅随附文件 LICENSE_1_0.txt 或在 https://boost.ac.cn/LICENSE_1_0.txt 复制副本)