


示例
像素级操作
以下是您可以使用像素值、像素指针和像素引用执行的一些操作
rgb8_pixel_t p1(255,0,0);     // make a red RGB pixel
bgr8_pixel_t p2 = p1;         // RGB and BGR are compatible and the channels will be properly mapped.
assert(p1==p2);               // p2 will also be red.
assert(p2[0]!=p1[0]);         // operator[] gives physical channel order (as laid down in memory)
assert(semantic_at_c<0>(p1)==semantic_at_c<0>(p2)); // this is how to compare the two red channels
get_color(p1,green_t()) = get_color(p2,blue_t());  // channels can also be accessed by name

const unsigned char* r;
const unsigned char* g;
const unsigned char* b;
rgb8c_planar_ptr_t ptr(r,g,b); // constructing const planar pointer from const pointers to each plane

rgb8c_planar_ref_t ref=*ptr;   // just like built-in reference, dereferencing a planar pointer returns a planar reference

p2=ref; p2=p1; p2=ptr[7]; p2=rgb8_pixel_t(1,2,3);    // planar/interleaved references and values to RGB/BGR can be freely mixed

//rgb8_planar_ref_t ref2;      // compile error: References have no default constructors
//ref2=*ptr;                   // compile error: Cannot construct non-const reference by dereferencing const pointer
//ptr[3]=p1;                   // compile error: Cannot set the fourth pixel through a const pointer
//p1 = pixel<float, rgb_layout_t>();// compile error: Incompatible channel depth
//p1 = pixel<bits8, rgb_layout_t>();// compile error: Incompatible color space (even though it has the same number of channels)
//p1 = pixel<bits8,rgba_layout_t>();// compile error: Incompatible color space (even though it contains red, green and blue channels)
下面是如何在通用代码中使用像素
template <typename GrayPixel, typename RGBPixel>
void gray_to_rgb(const GrayPixel& src, RGBPixel& dst)
{
  gil_function_requires<PixelConcept<GrayPixel> >();
  gil_function_requires<MutableHomogeneousPixelConcept<RGBPixel> >();

  typedef typename color_space_type<GrayPixel>::type gray_cs_t;
  static_assert(boost::is_same<gray_cs_t,gray_t>::value, "");

  typedef typename color_space_type<RGBPixel>::type  rgb_cs_t;
  static_assert(boost::is_same<rgb_cs_t,rgb_t>::value, "");

  typedef typename channel_type<GrayPixel>::type gray_channel_t;
  typedef typename channel_type<RGBPixel>::type  rgb_channel_t;

  gray_channel_t gray = get_color(src,gray_color_t());
  static_fill(dst, channel_convert<rgb_channel_t>(gray));
}

// example use patterns:

// converting gray l-value to RGB and storing at (5,5) in a 16-bit BGR interleaved image:
bgr16_view_t b16(...);
gray_to_rgb(gray8_pixel_t(33), b16(5,5));

// storing the first pixel of an 8-bit grayscale image as the 5-th pixel of 32-bit planar RGB image:
rgb32f_planar_view_t rpv32;
gray8_view_t gv8(...);
gray_to_rgb(*gv8.begin(), rpv32[5]);
如示例所示,源和目标都可以是引用或值,可以是平面格式或交错格式,只要它们分别符合 PixelConcept 和 MutablePixelConcept。
调整图像画布大小
调整图像画布大小意味着在现有像素周围添加像素缓冲区。图像画布的大小永远不能小于图像本身。
假设我们要用多个卷积核对图像进行卷积,其中最大的卷积核为 2K+1 x 2K+1 像素。在图像边界周围创建 K 像素的边距可能是有价值的。下面是如何做到这一点
template <typename SrcView,   // Models ImageViewConcept (the source view)
        typename DstImage>  // Models ImageConcept     (the returned image)
void create_with_margin(const SrcView& src, int k, DstImage& result)
{
  gil_function_requires<ImageViewConcept<SrcView> >();
  gil_function_requires<ImageConcept<DstImage> >();
  gil_function_requires<ViewsCompatibleConcept<SrcView, typename DstImage::view_t> >();

  result=DstImage(src.width()+2*k, src.height()+2*k);
  typename DstImage::view_t centerImg=subimage_view(view(result), k,k,src.width(),src.height());
  std::copy(src.begin(), src.end(), centerImg.begin());
}
我们分配了一个更大的图像,然后使用 subimage_view 创建了一个其中心区域的浅图像,其左上角位于 (k,k) 处,大小与 src 相同,最后我们将 src 复制到该中心图像中。如果边距需要初始化,我们可以使用 fill_pixels 来完成。下面是如何使用 copy_pixels 算法来简化此代码
template <typename SrcView, typename DstImage>
void create_with_margin(const SrcView& src, int k, DstImage& result)
{
  result.recreate(src.width()+2*k, src.height()+2*k);
  copy_pixels(src, subimage_view(view(result), k,k,src.width(),src.height()));
}
(另外请注意,image::recreate 比 operator= 更有效,因为后者会进行不必要的复制构造)。上面的示例不仅适用于任何颜色空间和像素深度的平面和交错图像;它也是经过优化的。GIL 会重载 std::copy - 当对两个没有行尾填充的相同交错图像调用时,它只会执行 memmove。对于平面图像,它会为每个通道执行 memmove。如果其中一个图像有填充(就像我们的情况一样),它会尝试为每一行执行 memmove。当图像没有填充时,它会使用其轻量级的水平迭代器(而不是必须检查行尾的更复杂的 1D 图像迭代器)。它会选择最快的方法,同时考虑静态和运行时参数。
直方图
可以通过计算落在每个 bin 中的像素值的数量来计算直方图。以下方法采用灰度(一维)图像视图,因为只有灰度像素可以转换为整数
template <typename GrayView, typename R>
void grayimage_histogram(const GrayView& img, R& hist)
{
  for (typename GrayView::iterator it=img.begin(); it!=img.end(); ++it)
      ++hist[*it];
}
使用 boost::lambda 和 GIL 的 for_each_pixel 算法,我们可以更紧凑地编写此代码
template <typename GrayView, typename R>
void grayimage_histogram(const GrayView& v, R& hist)
{
  for_each_pixel(v, ++var(hist)[_1]);
}
其中 for_each_pixel 调用 std::for_each,而 var 和 _1 是 boost::lambda 构造。为了计算亮度直方图,我们使用图像的灰度视图调用上述方法
template <typename View, typename R>
void luminosity_histogram(const View& v, R& hist)
{
  grayimage_histogram(color_converted_view<gray8_pixel_t>(v),hist);
}
这是调用它的方式
unsigned char hist[256];
std::fill(hist,hist+256,0);
luminosity_histogram(my_view,hist);
如果我们想查看图像左上角 100x100 区域的第二个通道的直方图,我们调用
grayimage_histogram(nth_channel_view(subimage_view(img,0,0,100,100),1),hist);
没有像素被复制,也没有分配额外的内存 - 代码直接在源像素上操作,这些像素可以是任何支持的颜色空间和通道深度。它们可以是平面格式或交错格式。
使用图像视图
以下代码说明了使用图像视图的强大功能
jpeg_read_image("monkey.jpg", img);
step1=view(img);
step2=subimage_view(step1, 200,300, 150,150);
step3=color_converted_view<rgb8_view_t,gray8_pixel_t>(step2);
step4=rotated180_view(step3);
step5=subsampled_view(step4, 2,1);
jpeg_write_view("monkey_transform.jpg", step5);
这里显示了中间图像
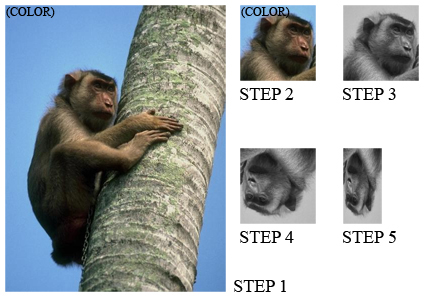
请注意,从来没有像素被复制。所有工作都在 jpeg_write_view 内部完成。如果我们使用 step5 调用我们的 luminosity_histogram,它将正确执行。